Listen to how MetaSynth can sound!
The MetaSynth Rooms

The Sample Editor
 All the rooms except the Montage Room output their audio (when you render it) to the Sample Editor. The Image Filter Room will always treat the audio file in the Sample Editor, while the Image Synth Room may use the audio file as an input.
A few tips and tricks you will enjoy in the Sample Editor:
• Command+"a" will select the whole audio file.
• Holding down the Command key while dragging the mouse, will select a portion of the audio file.
• You play back the audio file by activating the Sample Editor area and then clicking on the Space Bar.You may also use the play buttons: The gray button will play the audio from the start, the blue button will play the selected area (if any), and the loop button will play the whole audio file in loop.
• To understand the function of the other buttons in the right upper part of the Sample Editor, just point the mouse over each of them, and a short explanation is displayed on the bottom of the MetaSynth window.
The Image Synth
The most challenging room in MetaSynth is the Image Synth Room where you can build original sounds by painting with various on-screen tools or by importing images. Take a look at the large image above, where you see a raising and falling line of dots. Click here to hear how it sounds! This is the canvas of the Image Synth. When you push the Spacebar or click on the small speaker icon, you preview the sound that the canvas represents. The image plays back from left to right, and time is represented by the horizontal axis, while the vertical axis represents the pitch. To make stereo or panning effects, use the color tool: Yellow is center, red is left and green is right. In the example above, I set the tempo of the image synth window to 120 bpm and chose a Semitones scale, then painted the dots with the grid set to 8, filtered the notes to avoid notes that don't belong to the musical scale I chose, quantized the dots with the grid set to 8 and finally used a color filter to place each note in a different stereo position.

I looped the image in preview, clicked on the "Edit Instrument" icon and chose the Wave Synth (image above) as my sound source. The Wave Synth is a very powerful synthesizer. Tip: By adjusting the characteristics of the waveform in real time while the image synth plays back in preview, you can more easily find the kind of sound you want. Click here to listen.
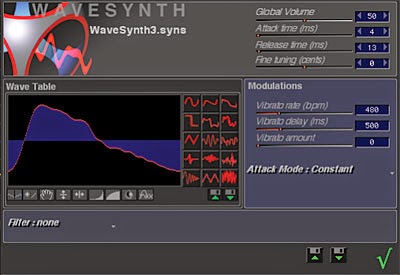 As you see on the right side of the Wave Synth window, you may adjust attack and release time, modulation and attack mode. In the lower part of the window, there are different filter settings that will also color you tone.
Back to the main Image Synth room: You can store the images you import or paint, in the Preset bank, and banks can be saved to your hard drive. When you save a preset, it remembers the sound source.
Tips: To delete a preset in a bank, hold down the Alt (Option) key when clicking on the preset you want to delete. To store a preset in a bank, first open the bank, then click on the small arrow to the left of the preset bank, and the preset will be stored in the first empty slot. To open the previously used preset bank, hold down the Command key when clicking on the preset bank icon.
The Image Filter

The Sequencer
This room is for painting notes like dots on the screen, not unlike a traditional MIDI sequencer. You may set the tempo in the lower part of the window, and the kind of scale (Major, Minor etc.) in the upper part. How the notes will sound, depend on the sound source, and just like in the other rooms, you may choose a Wave Synth or a Sampling Instrument. In the example below, (Note: The sound source you choose for playing back the sequence, will not be stored with the sequence, so remember to write it down if you plan to quit MetaSynth before you render the sequence.) I created a special Wave Synth with a powerful bass sound (in the Wave synth window placed on top of the Sequencer window).

The Spectrum Synth